

Similar to the earlier battles for Remits Maw, I created a book of contextual missions to allow for other players within the Jornath Facebook group to play specific themed scenarios, below I give you the first half of the scenarios from the book. These were designed to typify the sorts of engagements in the Guffmans-Platz front during and immediately after the surprise Ork offensive that occurred in the first year of the war.
Missions.
- Fighting on the Line! - Archetypal Missions of the War.
- Trench Assault
- Jornathii Vindratus
- The Battle for Fort Behras - Web Campaign
- Dawn on the Walls
- Thoroughfare of Blood
- Wall of Martyrs
- Pinnacle of Absolution
- Fields of Brass
Fighting on The Line.
The Ork counter offensive of the first summer was, not merely a surprise, it was also massive, stretching in excess of 600 km, from the Central Ctre Valley, all the way into Northern Kula and the Usamiljin Heights. The Bulk of the heavy fighting in the north saw the Imperium on the defensive. In some places, ancient lordly fortresses, bolstered by the mechanicus stood bristling with ordinance, surrounded by kilometers of trench lines, minefields, void shield generators and protected by legions of conscripted Jornath citizenry. But alas, this is the exception and not the rule, more often than not Cohort commanders or Guildmasters would suffice with a fortified barn and a dozen meters or so of earthworks and emplaced weapons to hold back regiment strength Ork units.
The Ecclesiarchy on Jornath recorded over twenty two hundred priests and acolytes of the ministorum, who died, of exhaustion, accidents or raids in the opening eighteen hours of the offensive. Without the efforts of the ministorum, it may have been impossible to give the conscripted soldiers the courage to die where they stood, buying time for the veteran reserves from the Kula combat zone to arrive and support the defenders. The ministorum is a constant presence in the life of an Imperial citizen, from birth all the way until death, for many, faith in the Imperial Cult can be a source of family, togetherness, and solace in a time of unremitting cruelty. The Cult furthers the traditions and culture of the wider Imperium, while its various planetary sects encourage worship of planetary martyrs, and how the deeds of that planet's guardsmen play into the labyrinthine story of the Imperial faith. So it was that on Jornath, the priests inspired the masses of terrified conscripts, huddled in sun baked trenches, with tales of the glories of Jornathi heros, guardsmen, commanders, and knights. The thunderous concussion of massed ork artillery punctuating the sermons, creating a symphonious harmony of death and faith, culminating in the two word litany of hateful defiance that would be the characterizing watchwords of the Summer. “Jornathii Vindratus” Jornathi twinged High Gothic, meaning vaguely “In the Wings of Death, We Are Jornath”
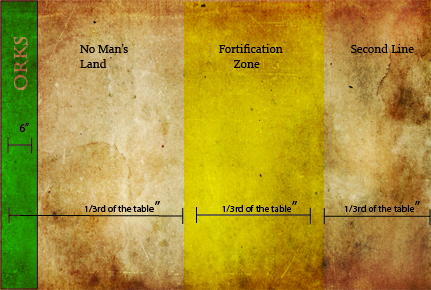
Trench Assault
- The board is divided lengthways into thirds
- The Imperial(s) may place any fortifications and obstacles inside the fortification zone
- The Imperials deploy any of his troops, HQ’s, or Heavy Support units in the fortification zone, he doesn’t have to set-up all of them but he does need at least one. The rest of his forces are in reserve.
- The Ork deploys all his forces in No Man’s Land, up to 6’’ from his table edge, any forces that will not fit are placed into reserve.
Objective: The attacker must get as many units as possible into the ‘second line’ he will get 2 Points for every unit there at the end of the game, while the defender will get 1 Point for every enemy unit not within his second line.
Special Rules:
Fortified Position- The Imperials do not have to pay for any of their defenses, minefields, bunkers, sandbags, trenches, and bastions are placed from the players terrain collection.
Da Big Gunz’ - The Orks gain a preliminary bombardment, that they may use before the beginning of their first movement phase. It consists of D3 Large Blasts, with no ability to reduce scatter, hitting at Strength 3 Ap 6, Pinning.
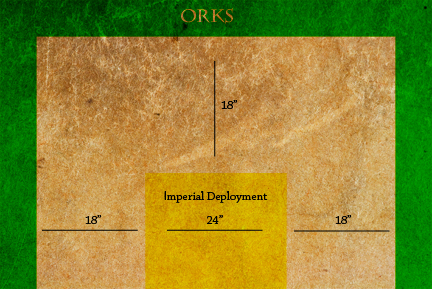
Jornathii Vindratus
- The Orks deploy on one long table edge, and both short table edges, 18 inches away from the Imperial Deployment zone
- Any structures or fortifications should be placed within or immediately surrounding the imperial deployment zone. While any craters or ruins should be placed in between both forces deployment areas.
- The mission is divided into 3 segments, referred to as Primus, Secundus and Tertiarum, the objective of the Orks is to wipe out or rout all Imperial forces as quickly as possible. While the Imperials are attempting keep their forces alive for as many turns as possible.
- Primus represents only the most early stages of the assault, being turns 1-2, while Secundus is turns 3-5, and Tertiarum is 6+. The game ends when all Imperial troops have been routed or killed.
Objectives: The Imperials “win” the game if they can survive until the Tertiarum stage of the attack, the Orks will win if they can eliminate the Imperial forces before the end of turn 5.
Special Rules:
Da Big Mob: The Ork force should be at least twice the total points of the Imperial defenders, it should be divided into two halves of equivalent points, with the second half arriving from the Ork table edges in the ‘Secundus’ phase.
The Battle of Fort Behras
Under cover of precision raids by the Dreadmare Companions, Blood Angels, and White Scars, the Guffmans Platz cohorts of the J-PDF withdrew from the Ctre Valley to Fort Behras, and dozens of fortified bastions all across the defensive line separating the Ork held northern mountains and the critical rail lines, and population centres of the foothills. The Fortress represented the pivotal loadstone of the entire northern defensive network, from here Jornathi units could be marshalled and supported with massive long range anti-air missile sites, siege cannon, and stockpiles of supplies. Should the fortress fall, it would represent a catastrophic turn in the Northern campaign, with the removal of a major strategic asset for offensive actions, and all manner of heavy ordnance potentially being looted by the aliens. Whether the Blood Axe Warboss Krump knew of the massive strategic importance that the Fortress afforded his adversaries or whether he just knew it would provide the most challenge in overcoming is secondary to the fact that his greenskins, would kick off the summer invasion with a vicious dawn blitz at the fortress’ walls. The crucial nature of the location, saw the Imperium’s finest cast into the fire to stymie the Ork hordes, what few veteran guardsmen the Guffmans Platz Cohort had, were located within the plastcrete walls of the fortress. Many fresh from the horrors of Remits Maw, had vengeful debts of scores of fallen friends, and the tear filled eyes of terrified Jornathi citizenry to fuel their defiant stand against the Xenos. The fiery contrails of hundreds of Imperial fighter craft duelled above the skies of Behras with screaming Blood Axe Fighta’ Acez, and Skwadrons of Deffkoptas; as below in dust choked thoroughfares grinding looted wagons, stompas, and Kustom Mek creations, were smashed apart by Imperial Guard sapper teams, plasma turrets, and units of Astartes Devastators. The fortress was built into the rock of Hill 906, an orphaned peak at the apex of the Ctre glacial valley, its white rock, hollowed out thousands of years ago, and replaced with miles of underground generators, command centers, factories and hab blocks. In effect a small underground city, with towering cathedrals of the immortal emperor serving as the entrance and exit way, all surrounded by criss-crossing processional avenues, drill squares, artillery pits, and a 30 meter reinforced plastcrete wall replete with bastions. Every meter, the Orks took of the Fortress would be paved in the slick black blood of the alien.
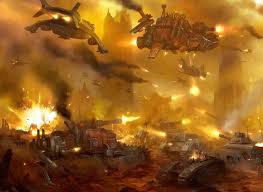
Dawn on the Walls
Credit: James Barr
Deployment: Long table edges. IG player can set up trenches and other terrain as desired in their deployment zone (18” in from their table edge). Spread craters, wrecked vehicles (from much earlier failed raid) and assorted other terrain in the remainder. IG set up first, up to 18” from their edge and place three objectives. Orks deploy second up to 6” from their table edge and go first. Space Marines are all in Reserve.
Special Rules:
Unexpected attack: Night Fight for first two turns. During those turns, IG units that are further than 12” from an Ork unit must pass a Ld check to move, run, or shoot. For this purpose roll for vehicles as if they had Ld8. If a unit is given an order, consider the check to follow the order the check to pass this as well; you do not have to roll twice to follow an order.
Counter Strike: All Space Marine units start in Reserve and gain Outflank. For all units that arrive on the same turn, the controlling player may elect to use one roll for all of them when determining the table side they arrive on. If an HQ model or a unit of bikers, scout bikers, or scouts are part of the outflanking units that turn, the combined roll may be re-rolled if desired.
Wake the guns: If at any point the Orks control two or more objectives, sector command will accept this as a serious attack and release artillery assets. After this condition is met, once during the game in their shooting phase the IG player may call in artillery support. This takes the form of 3 Basilisk shots (S9 AP3 large blast ordnance barrage, range unlimited). Do not reduce scatter by BS; use the full 2d6” but a HIT still applies. With dialed-in coordinates, they may be centered on any objective instead of on a model – if you do so you may re-roll the scatter if desired.
Victory Conditions: Each objective is worth 3pts. The Orks get 1VP for each Ork unit that exits the defender table edge. Defender gets 1VP for every two non-HQ Ork units destroyed, and 2VP for every Ork HQ unit destroyed.
Campaign Outcome:
If the mission results in an ORK victory, the next mission played will be Thoroughfare of Death,
If the mission results in an IMPERIAL victory the next mission played will be Wall of Martyrs
Thoroughfare of Death
Deployment: Short Table Edges, extending 12’’. With terrain being placed only 12’’ in from the long table edges. Order of Placement and 1st Turn is determined through roll-off.
Special Rules:
Counter Strike: All Space Marine units start in Reserve and gain Outflank. For all units that arrive on the same turn, the controlling player may elect to use one roll for all of them when determining the table side they arrive on. If an HQ model or a unit of bikers, scout bikers, or scouts are part of the outflanking units that turn, the combined roll may be re-rolled if desired.
Triumphal Bastion: All bastions purchased by the Imperial forces are free, but reduced to a limit of 0-2, they must be placed parallel to the other on opposite sides of the road. These bastions are each equipped with a twin-linked plasma cannon on top, and 4 heavy bolter casements.
Victory Conditions: 3 objectives are placed along the length of the board. One each in the Ork and Imperial deployments, and one in the exact center of the table. The force that commands the most objectives at the end of 6 turns is the Victor.
Campaign Outcome:
In the event of an Ork victory the next game will be Pinnacle of Absolution
In the event of an Imperial victory the next game will be Fields of Brass
Wall of Martyrs
Deployment: Imperial forces may deploy anywhere within the boundaries of the fortress, including on the walls. Ork forces will deploy in 6’’ from the table edge(s) opposite the fortress wall.
Special Rules:
Fortress Walls: The Imperial player(s) place a piece of impassable terrain that must at least encompass a 12” square area. But may at its largest bisect the table at its centre. The Fortress Walls are Armor Value: 14 with 3 Hull Points, and can be attack in 6’’ sections.
Killtower: An Ork motorized siege tower, the Orks start the scenario with 2 free such vehicles with the following profile. And have a disembarkation point of equivalent height to that of the fortress walls.
Vehicle, Assault Ramp, 2x Big Shootas
Transport Capacity: 20
Armor Value:
Front : 14 Side: 14 Rear: 10 HP: 3
Stymie the Gap: Imperial Guard troops fighting on an area of destroyed “Fortress Walls” is Fearless
Victory Conditions: The Scenario is determined through Victory Points, with Victory Points being determined through the points cost of enemy units killed.
Campaign Outcome:
In the event of an Imperial victory, the Imperium wins the Battle of Fort Behras
In the event of an Ork victory, the next game is Thoroughfare of Death
Pinnacle of Absolution
Deployment: The Imperials deploy within two 10’’ squares, whose center is 1 foot in from the short table edges. The Orks will deploy 6’’ in along one of the long table edges. Any Orks that cannot fit are placed into Ongoing Reserve. Any Imperial forces from Codex: Astra Militarum, or Militarum Tempestus, not in a Valkyire or Vendetta Gunship that cannot fit are considered destroyed. Those within these vehicles, or from the space marine codices are placed into Ongoing Reserve to arrive via deep strike.
Special Rules:
Flower of the Emperor: At the center of each Imperial deployment zone sits the control panel for one of two Sanctioned Nuclear Warheads. They are ticking down, to prevent the Orks from claiming the resources of Behras, hopefully purging thousands of Xenos in the process. The arcane machineries of the ancient weapons are painfully delicate, and require the ceaseless ministrations of their sworn caretakers, all the way up until the seconds before detonation, Therefore, The Orks Cannot be allowed to destroy the panel or its operator.
Victory Conditions: The Orks must obtain an “Objective Secured” on both of the control panels described in “flower of the emperor” The Imperials Must prevent this for 5 turns. At the end of Turn 5 the game immediately ends.
Campaign Outcome:
In the event of an Imperial victory, the Battle for Fort Behras is a Strategic Draw
In the event of an Ork victory, the Battle of Fort Behras is an Ork Victory.
Fields of Brass
Deployment: Played either on the floor or on multiple tables, the playing space should be approximately 8 x 12. Ork and Imperials deploy 12’’ in from either short table edge.
Special Rules:
Tank Warfare. All Infantry units that can take an dedicated transport vehicle MUST take them, or they are not allowed to be utilized in this mission. At least 50% of the forces total points MUST be spent on units with the vehicle unit type.
Victory Conditions: The Scenario is determined through Victory Points, with Victory Points being determined through the points cost of enemy units killed.
Campaign Outcome:
In the event of an Imperial victory, the next game will be Wall of Martyrs
In the event of an Ork victory, the next game will be Thoroughfare of Death

No comments:
Post a Comment
Please refrain from profanity and adult content. Thank You.